Moin,
hier mal meine Anleitung (Aufwand um die 60 Minuten)
Als erstes braucht ihr einen YubiKey der PGP unterstützt, zum Beispiel 5c NFC. Denkt immer daran das ihr am besten einen weiteren Yubikey sicher verwahrt habt, als Backup.
Yubikey und OpenSSH
Teil 1: Vorbereiten des Sticks
Yubikey Stick vorbereiten:
Yubikey Manger installieren:
und dann per cmd: ykman openpgp reset
Key direkt auf dem Stick generieren (PC ist dabei offline):
GPG4WIN installieren, nur die erste Checkbox im Installer, der Rest wird nicht benötigt: https://www.gpg4win.org/
Generating Your PGP Key directly on Your YubiKey
Warning: Generating the PGP on the YubiKey ensures that malware can never steal your PGP private key, but it means that the key can not be backed up so if your YubiKey is lost or damaged the PGP key is irrecoverable.
Insert the YubiKey into the USB port if it is not already plugged in.
Open Command Prompt (Windows) or Terminal (macOS / Linux).
Enter the GPG command: gpg --card-edit
At the gpg/card> prompt, enter the command: admin
If you want to use keys larger than 2048 bits, run: key-attr (hier machen wir 4096 für alle drei Slots)
Enter the command: generate
When prompted, specify if you want to make an off-card backup of your encryption key.
Note: This is a shim backup of the private key, not a full backup, and cannot be used to restore to a new YubiKey. -> kein Backup erstellen!
Specify how long the key should be valid for (specify the number in days, weeks, months, or years).
Confirm the expiration day.
When prompted, enter your name.
Enter your email address.
If needed, enter a comment.
Review the name and email, and accept or make changes.
Enter the default admin PIN again. The green light on the YubiKey will flash while the keys are being written.
Enter a Passphrase as the key will not allow you to pass without having a passphrase. If you do not enter a Passphrase generation will fail.
Public Key exportieren:
gpg --export-ssh-key <authentication-key-id> > ssh_auth_key.pub
GPG starten:
gpg-connect-agent /bye
Touch auf dem Stick aktivieren:
ykman openpgp set-touch aut on
User PIN, Admin PIN und Reset Pin ändern (den User PIN sollte man vorher von den Usern erfragen, welchen sie haben wollen) :
gpg --card-edit
admin
passwd
Auf den Clients:
GPG4WIN installieren (die aktuelle Version!):
nur die erste Checkbox im Installer, der Rest wird nicht benötigt: https://www.gpg4win.org/
GPG Agent in den Autostart auf den Clients:
The most simple solution is to create a shortcut of:
C:\Program Files (x86)\GnuPG\bin\gpg-connect-agent.exe inside of:
C:\Users\USER\AppData\Roaming\Microsoft\Windows\Start Menu\Programs\Startup
Modify the shortcut, so that the "Target" ends with /bye, such as: "C:\Program Files (x86)\GnuPG\bin\gpg-connect-agent.exe" /bye.
The /bye is a necessary argument so that the command starts the agent and exits afterwards.
Putty und/oder OpenSSH Integration aktivieren
Anlegen: C:\Users\USER\AppData\Roaming\gnupg\ gpg-agent.conf
Inhalt der conf:
enable-putty-support
enable-win32-openssh-support
Optional für Putty -> aktivieren:
Connection -> SSH -> Auth -> Allow Agent Forwarding
GPG starten:
gpg-connect-agent /bye
(Optional nur bei Bedarf) GPG beenden:
gpg-connect-agent KILLAGENT /bye
Teil 2: SSH auf dem Windows Server aktivieren und die public Keys hinterlegen
Speichert euch das als ps1 Skript und führt es aus:
Hinterlegt die sshd.config in diesem Folder: %PROGRAMDATA%\ssh\sshd_config
Hinterlegt die public keys in diesem Folder : %PROGRAMDATA%/ssh/administrators/
Das sieht dann so aus:
Wichtig: der Name des pub Files muss so lauten, wie auch der User lautet, der sich versucht anzumelden!

Korrigiert die Rechte der public Keys, kopiert den Inhalt in eine administrative PS (das müsst ich auch dann wieder ausführen, wenn ihr neue oder weitere Keys abelegt):
Teil 3: euren Client vorbereiten der per SSH Zugriff bekommen soll
Das war es im Grunde auch schon Da bei mir die Weiterleitung vom Windows GPG nicht sauber zu Putty funktioniert, stoppe ich das mit
und benutze ein anderes Third Party Tool: https://smartcard-auth.de/download-de.html

Das braucht nicht installiert zu werden, es muss lediglich gestartet werden. Achtet bitte darauf das es sich um eine Trial handelt, allerdings kann man sich eine Lizenz (ich glaube 1€) kaufen. Wenn ihr das tun wollt, verbindet euch ein paar mal hintereinander dann per Putty zu eurem Server, dann kommt ein Dialog mit einem Link
Wenn ihr prüfen möchtet, ob der Key richtig erkannt wurde:
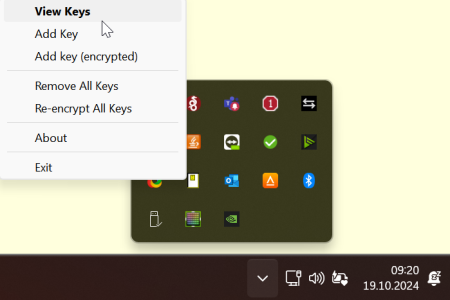
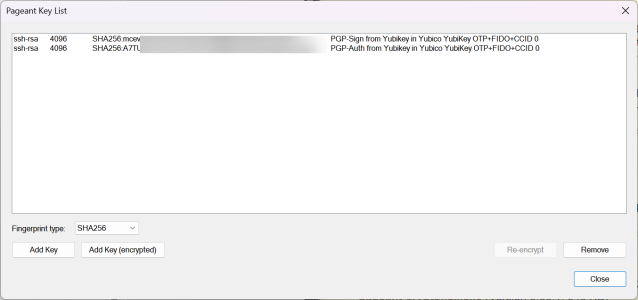
So...das war es dann im Grunde schon, wenn ihr fertig seid, solltet ihr den Windows Server einmal rebooten, Firewall seitig Port 22 TCP erlauben und noch etwas im Putty konfigurieren:
Legt euren Server an und speichert das unter einem Namen:
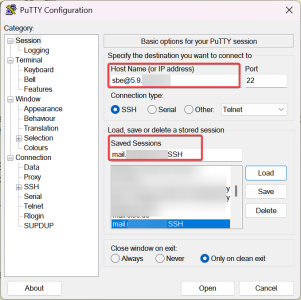
Erlaubt das Forwarding des Agtenten:
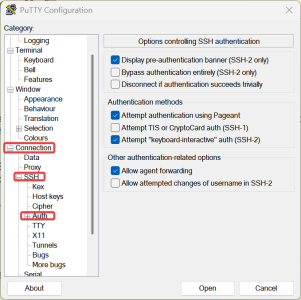
Dann könnt ihr euch noch einen TCP Tunnel in Putty anlegen um zum Beispiel die NCC oder RDP zu tunneln
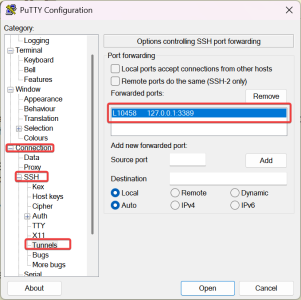
Bedeutet in meinem Fall, wenn ich per RDP auf den Server will, verbinde ich mich einfach per mstsc auf 127.0.0.1:10458 (ich könnt natürlich auch jeden anderen High Port nehmen)
Wenn ihr die NCC wollt, könnt ihr zum Beispiel das hier eintragen:

Dann tragt ihr in der NCC unter Verbindung dann auch 127.0.0.1 6060 ein.
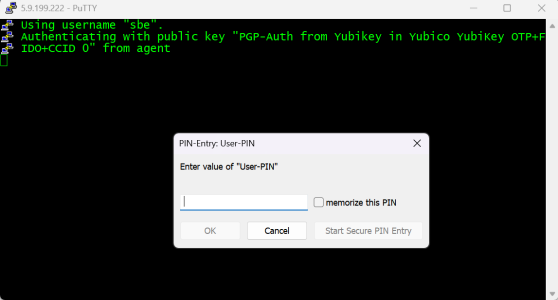
Funktioniert alles sauber und ihr macht zum ersten mal eine Verbindung auf, sollte es so aussehen und die Frage nach der PIN kommen (nachdem ihr die Pin eingegeben habt, blinkt euer YubiKey und ihr müsst diesen einmal auf dem Touchfeld anfassen):
---------------------------------------------------------------------------------------------------------------------------------------------------------------------------------
Noch ein paar abschließende Worte:
Das ist mein privates Projekt, wendet euch damit bitte nicht an den NSP Support, die werden euch nicht helfen wenn etwas ist. Sprecht mich oder Jan hier im Forum an.
Macht ihr das, arbeitet immer mit einem Backup User und Backup Key, sonst kommt ihr im Zweifel nicht mehr Remote auf eure Maschine.
Privat verzichte ich komplett auf SSH Firewall Restriktionen, es ist ja nur noch Key Auth erlaubt und nichts anderes... da können sich Hacker gerne dran austoben. Wie ihr das handhabt obliegt komplett euch.
Was ich natürlich auch privat mache: ich nutze den Key für alle meine Linux Maschinen, ich nutze egal wo es geht auch Fido2 oder FidoU2F um meine Webdienste wie zu MS oder meinem DNS Provider abzusichern.
Dadurch das PGP (SSH) Key in einer gesicherten Enklave erstellt wurde, kann man sich, wie unter Linux SSH üblich, eine Key Segmentierung pro Server sparen. Der Key wurde ja direkt auf dem Token generiert, ist nicht exportierbar und selbst bei einem Diebstahl sperrt sich der Key nach der 3 fehlgeschlagenen Versuchen. Nur mit der Admin PIN kann der User auf dem YubiKey wieder reaktiviert werden: Benutzt also sichere und 8 stellige PINs
hier mal meine Anleitung
Als erstes braucht ihr einen YubiKey der PGP unterstützt, zum Beispiel 5c NFC. Denkt immer daran das ihr am besten einen weiteren Yubikey sicher verwahrt habt, als Backup.
Yubikey und OpenSSH
Teil 1: Vorbereiten des Sticks
Yubikey Stick vorbereiten:
Yubikey Manger installieren:
und dann per cmd: ykman openpgp reset
Key direkt auf dem Stick generieren (PC ist dabei offline):
GPG4WIN installieren, nur die erste Checkbox im Installer, der Rest wird nicht benötigt: https://www.gpg4win.org/
Generating Your PGP Key directly on Your YubiKey
Warning: Generating the PGP on the YubiKey ensures that malware can never steal your PGP private key, but it means that the key can not be backed up so if your YubiKey is lost or damaged the PGP key is irrecoverable.
Insert the YubiKey into the USB port if it is not already plugged in.
Open Command Prompt (Windows) or Terminal (macOS / Linux).
Enter the GPG command: gpg --card-edit
At the gpg/card> prompt, enter the command: admin
If you want to use keys larger than 2048 bits, run: key-attr (hier machen wir 4096 für alle drei Slots)
Enter the command: generate
When prompted, specify if you want to make an off-card backup of your encryption key.
Note: This is a shim backup of the private key, not a full backup, and cannot be used to restore to a new YubiKey. -> kein Backup erstellen!
Specify how long the key should be valid for (specify the number in days, weeks, months, or years).
Confirm the expiration day.
When prompted, enter your name.
Enter your email address.
If needed, enter a comment.
Review the name and email, and accept or make changes.
Enter the default admin PIN again. The green light on the YubiKey will flash while the keys are being written.
Enter a Passphrase as the key will not allow you to pass without having a passphrase. If you do not enter a Passphrase generation will fail.
Public Key exportieren:
gpg --export-ssh-key <authentication-key-id> > ssh_auth_key.pub
GPG starten:
gpg-connect-agent /bye
Touch auf dem Stick aktivieren:
ykman openpgp set-touch aut on
User PIN, Admin PIN und Reset Pin ändern (den User PIN sollte man vorher von den Usern erfragen, welchen sie haben wollen) :
gpg --card-edit
admin
passwd
Auf den Clients:
GPG4WIN installieren (die aktuelle Version!):
nur die erste Checkbox im Installer, der Rest wird nicht benötigt: https://www.gpg4win.org/
GPG Agent in den Autostart auf den Clients:
The most simple solution is to create a shortcut of:
C:\Program Files (x86)\GnuPG\bin\gpg-connect-agent.exe inside of:
C:\Users\USER\AppData\Roaming\Microsoft\Windows\Start Menu\Programs\Startup
Modify the shortcut, so that the "Target" ends with /bye, such as: "C:\Program Files (x86)\GnuPG\bin\gpg-connect-agent.exe" /bye.
The /bye is a necessary argument so that the command starts the agent and exits afterwards.
Putty und/oder OpenSSH Integration aktivieren
Anlegen: C:\Users\USER\AppData\Roaming\gnupg\ gpg-agent.conf
Inhalt der conf:
enable-putty-support
enable-win32-openssh-support
Optional für Putty -> aktivieren:
Connection -> SSH -> Auth -> Allow Agent Forwarding
GPG starten:
gpg-connect-agent /bye
(Optional nur bei Bedarf) GPG beenden:
gpg-connect-agent KILLAGENT /bye
Teil 2: SSH auf dem Windows Server aktivieren und die public Keys hinterlegen
Speichert euch das als ps1 Skript und führt es aus:
Code:
#Check if SSH-Server is already installed
"Check if SSH-Server is already installed.."
if ((Get-WindowsCapability -Online | Where-Object {$_.Name -like "OpenSSH.Server*" -and $_.State -eq "Installed"})) {
    "SSH-Server detected. No installation needed."
}
else {
    "No SSH-Server detected. Searching for Windows Capability.."
    #Get Windows capabilities which are not installed
    $AvailabeCapabilities = Get-WindowsCapability -Online | Where-Object {$_.Name -like "OpenSSH.Server*" -and $_.State -eq "NotPresent"}
    #If the count of capabilities found not equal 1, abort installation to prevent failures.
    if ($AvailabeCapabilities.Count -ne 1) {
        throw "The ammount of available capabilities does not eqal 1. Installation is aborded."
    }
    else {
        "$($AvailabeCapabilities.Name) found. Starting installation.."
        Add-WindowsCapability -Online -Name $AvailabeCapabilities.Name
    }
}
#Configure SSH-Server
"Configuring SSH Server"
#Check if service sshd starttype is automatic
if ((Get-Service sshd).StartType -ne "Automatic") {
    "Setting sshd service starttype to automatic"
    Set-Service sshd -StartupType Automatic
}
else {
    "sshd service starttype ist already automatic."
}
#Copy sshd_config
#"Copying sshd_config from $env:SYSTEM_ARTIFACTSDIRECTORY\scripts\scripts\sshd_config to ssh $env:PROGRAMDATA\ssh\sshd_config"
#Copy-Item -Path "$env:SYSTEM_ARTIFACTSDIRECTORY\scripts\scripts\sshd_config" -Destination "$env:PROGRAMDATA\ssh\sshd_config"

#Set default SSH shell to PowerShell instead of cmd
$registryPath = "HKLM:\SOFTWARE\OpenSSH"
$registryKey = "DefaultShell"
$powerShellPath = "C:\Windows\System32\WindowsPowerShell\v1.0\powershell.exe"

if (Test-Path $registryPath) {
    $registryKeyAtPath = Get-Item -LiteralPath $registryPath
    if ($registryKeyAtPath.GetValue($registryKey)) {
        $keyValue = Get-ItemProperty -Path $registryPath -Name $registryKey | Select-Object -ExpandProperty $registryKey
        "Default shell for SSH: Registry key DefaultShell already exists: $keyValue"

        if ($keyValue -ne $powerShellPath) {
            "Current value is not equal to target value. Setting key DefaultShell to: $powerShellPath"
            Set-ItemProperty -Path $registryPath -Name $registryKey -Value $powerShellPath
        } else {
            "Current value is equal to target value. No changes needed."
        }
    } else {
        "Default shell for SSH: Registry key DefaultShell set to: $powerShellPath"
        New-ItemProperty -Path $registryPath -Name $registryKey -Value $powerShellPath -PropertyType String -Force | Out-Null
    }
} else {
    "Default shell for SSH: Registry key DefaultShell set to: $powerShellPath"
    New-Item -Path $registryPath -Force | Out-Null
    New-ItemProperty -Path $registryPath -Name $registryKey -Value $powerShellPath -PropertyType String -Force | Out-Null
}
Hinterlegt die sshd.config in diesem Folder: %PROGRAMDATA%\ssh\sshd_config
Code:
# This is the sshd server system-wide configuration file.  See
# sshd_config(5) for more information.

# The strategy used for options in the default sshd_config shipped with
# OpenSSH is to specify options with their default value where
# possible, but leave them commented.  Uncommented options override the
# default value.

#Port 22
#AddressFamily any
#ListenAddress 0.0.0.0
#ListenAddress ::

#HostKey __PROGRAMDATA__/ssh/ssh_host_rsa_key
#HostKey __PROGRAMDATA__/ssh/ssh_host_dsa_key
#HostKey __PROGRAMDATA__/ssh/ssh_host_ecdsa_key
#HostKey __PROGRAMDATA__/ssh/ssh_host_ed25519_key

# Ciphers and keying
#RekeyLimit default none

# Logging
#SyslogFacility AUTH
#LogLevel INFO

# Authentication:

#LoginGraceTime 2m
#PermitRootLogin prohibit-password
#StrictModes yes
#MaxAuthTries 6
#MaxSessions 10

PubkeyAuthentication yes

# The default is to check both .ssh/authorized_keys and .ssh/authorized_keys2
# but this is overridden so installations will only check .ssh/authorized_keys
AuthorizedKeysFile    .ssh/authorized_keys

#AuthorizedPrincipalsFile none

# For this to work you will also need host keys in %programData%/ssh/ssh_known_hosts
#HostbasedAuthentication no
# Change to yes if you don't trust ~/.ssh/known_hosts for
# HostbasedAuthentication
#IgnoreUserKnownHosts no
# Don't read the user's ~/.rhosts and ~/.shosts files
#IgnoreRhosts yes

# To disable tunneled clear text passwords, change to no here!
PasswordAuthentication no
#PermitEmptyPasswords no

# GSSAPI options
#GSSAPIAuthentication no

#AllowAgentForwarding yes
#AllowTcpForwarding yes
#GatewayPorts no
#PermitTTY yes
#PrintMotd yes
#PrintLastLog yes
#TCPKeepAlive yes
#UseLogin no
#PermitUserEnvironment no
#ClientAliveInterval 0
#ClientAliveCountMax 3
#UseDNS no
#PidFile /var/run/sshd.pid
#MaxStartups 10:30:100
#PermitTunnel no
#ChrootDirectory none
#VersionAddendum none

# no default banner path
#Banner none

# override default of no subsystems
Subsystem    sftp    sftp-server.exe

# Example of overriding settings on a per-user basis
#Match User anoncvs
#    AllowTcpForwarding no
#    PermitTTY no
#    ForceCommand cvs server

Match User monitoring
       AuthorizedKeysFile C:/Users/monitoring/.ssh/authorized_keys

Match Group administrators
       AuthorizedKeysFile __PROGRAMDATA__/ssh/administrators/%u.pub
Hinterlegt die public keys in diesem Folder : %PROGRAMDATA%/ssh/administrators/
Das sieht dann so aus:
Wichtig: der Name des pub Files muss so lauten, wie auch der User lautet, der sich versucht anzumelden!

Korrigiert die Rechte der public Keys, kopiert den Inhalt in eine administrative PS (das müsst ich auch dann wieder ausführen, wenn ihr neue oder weitere Keys abelegt):
Code:
$LocalStoreSSHKeys = Get-ChildItem -Path "$env:programdata\ssh\administrators"
    foreach ($LocalStoreSSHKey in $LocalStoreSSHKeys) {
        "Set correct ACL for $($LocalStoreSSHKey.Fullname)"
        $acl = Get-Acl $LocalStoreSSHKey.Fullname
        $acl.SetAccessRuleProtection($true, $false)
        $administratorsRule = New-Object system.security.accesscontrol.filesystemaccessrule("Administrators","FullControl","Allow")
        $systemRule = New-Object system.security.accesscontrol.filesystemaccessrule("SYSTEM","FullControl","Allow")
        $acl.SetAccessRule($administratorsRule)
        $acl.SetAccessRule($systemRule)
        $acl | Set-Acl
    }
Teil 3: euren Client vorbereiten der per SSH Zugriff bekommen soll
Das war es im Grunde auch schon
Code:
gpg-connect-agent KILLAGENT /byeund benutze ein anderes Third Party Tool: https://smartcard-auth.de/download-de.html

Das braucht nicht installiert zu werden, es muss lediglich gestartet werden. Achtet bitte darauf das es sich um eine Trial handelt, allerdings kann man sich eine Lizenz (ich glaube 1€) kaufen. Wenn ihr das tun wollt, verbindet euch ein paar mal hintereinander dann per Putty zu eurem Server, dann kommt ein Dialog mit einem Link
Wenn ihr prüfen möchtet, ob der Key richtig erkannt wurde:


So...das war es dann im Grunde schon, wenn ihr fertig seid, solltet ihr den Windows Server einmal rebooten, Firewall seitig Port 22 TCP erlauben und noch etwas im Putty konfigurieren:
Legt euren Server an und speichert das unter einem Namen:

Erlaubt das Forwarding des Agtenten:

Dann könnt ihr euch noch einen TCP Tunnel in Putty anlegen um zum Beispiel die NCC oder RDP zu tunneln

Bedeutet in meinem Fall, wenn ich per RDP auf den Server will, verbinde ich mich einfach per mstsc auf 127.0.0.1:10458 (ich könnt natürlich auch jeden anderen High Port nehmen)
Wenn ihr die NCC wollt, könnt ihr zum Beispiel das hier eintragen:
Dann tragt ihr in der NCC unter Verbindung dann auch 127.0.0.1 6060 ein.
Funktioniert alles sauber und ihr macht zum ersten mal eine Verbindung auf, sollte es so aussehen und die Frage nach der PIN kommen (nachdem ihr die Pin eingegeben habt, blinkt euer YubiKey und ihr müsst diesen einmal auf dem Touchfeld anfassen):

---------------------------------------------------------------------------------------------------------------------------------------------------------------------------------
Noch ein paar abschließende Worte:
Das ist mein privates Projekt, wendet euch damit bitte nicht an den NSP Support, die werden euch nicht helfen wenn etwas ist. Sprecht mich oder Jan hier im Forum an.
Macht ihr das, arbeitet immer mit einem Backup User und Backup Key, sonst kommt ihr im Zweifel nicht mehr Remote auf eure Maschine.
Privat verzichte ich komplett auf SSH Firewall Restriktionen, es ist ja nur noch Key Auth erlaubt und nichts anderes... da können sich Hacker gerne dran austoben. Wie ihr das handhabt obliegt komplett euch.
Was ich natürlich auch privat mache: ich nutze den Key für alle meine Linux Maschinen, ich nutze egal wo es geht auch Fido2 oder FidoU2F um meine Webdienste wie zu MS oder meinem DNS Provider abzusichern.
Dadurch das PGP (SSH) Key in einer gesicherten Enklave erstellt wurde, kann man sich, wie unter Linux SSH üblich, eine Key Segmentierung pro Server sparen. Der Key wurde ja direkt auf dem Token generiert, ist nicht exportierbar und selbst bei einem Diebstahl sperrt sich der Key nach der 3 fehlgeschlagenen Versuchen. Nur mit der Admin PIN kann der User auf dem YubiKey wieder reaktiviert werden: Benutzt also sichere und 8 stellige PINs
Zuletzt bearbeitet: